
Help:MediaWiki-Vagrant in Cloud VPS

This page will help you understand MediaWiki-Vagrant in Cloud VPS.
About MediaWiki-Vagrant in Cloud VPS
MediaWiki-Vagrant in Cloud VPS provisions a full MediaWiki stack by applying the role::labs::mediawiki_vagrant Puppet role to a Cloud VPS instance. This role will install Vagrant, LXC and MediaWiki-Vagrant on the target host. This combination allows using the full features of the MediaWiki-Vagrant stack including the custom Vagrant plugin on the Cloud VPS virtual machine.
Setting up your instance with MediaWiki-Vagrant
Steps to launch an instance:
-
 Step 1: Fill out the name
 -
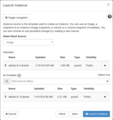 Step 2: Select an image
 -
 Step 3: Choose a resource size
 -
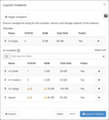
 Step 4: Edit the instance you created


- Create your instance
- Choose the instance size:
- m1.small is fine for 80% of wikis created in Cloud VPS.
- m1.medium or m1.large will be helpful if your wiki will host tens of thousands of pages or be used by more than 10 concurrent (simultaneous) users on a regular basis.
- If your project has custom security group settings, Make sure the instance is in a group that allows access on port 8080. (If you haven't changed the settings, the
defaultgroup will include it.)
- Choose the instance size:
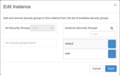
- Apply the role
role::labs::mediawiki_vagrant. You can do this in Horizon. (If you have multiple Cloud VPS projects, make sure the right one is selected at the top left of the page!)- Most commonly, you would do this in the instance configuration (in the left menu Compute -> Instances -> click on instance name -> Puppet Configuration tab -> edit Puppet Classes).
- If you have several virtual machines in the project and want to run Vagrant on all of them, you can set puppet rules for the whole project via Puppet (in the left menu) -> Project Puppet.
- Or in the same menu select Prefix Puppet to only apply the rules to virtual machines whose name matches a given prefix:
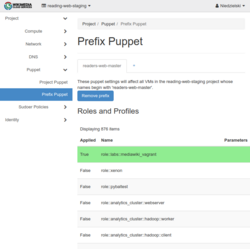
Configuring Puppet role per instance instead of across all instances helps keep mistakes from spreading.
- ssh to your instance, and run sudo run-puppet-agent to ensure that the latest Puppet changes have been applied.
- Log out and log back in (so that your shell will pick up the command alias from
profile.dthat will make the vagrant command run Vagrant as themwvagrantshared user account). Note: skipping this step will cause problems! - Change to the directory that MediaWiki-Vagrant has been pre-installed in: cd /srv/mediawiki-vagrant
- Start the LXC container and provision MediaWiki in it: vagrant up (this will take a while; on a g3.cores1.ram2.disk20 instance, about 20 minutes).
- If you get a NFS error, run vagrant destroy -f && vagrant up;
- don't worry if you get the following error at the end of the process, the container will actually work:
- The SSH command responded with a non-zero exit status. Vagrant assumes that this means the command failed. The output for this command should be in the log above. Please read the output to determine what went wrong.
- Verify that the new wiki is accessible from the host: curl http://localhost:8080/wiki/Main_Page
- If you get an error like "curl: (7) Failed to connect to localhost port 8080: Connection refused" you may need to run vagrant reload to restart the LXC container and trigger Vagrant to setup the proper port forwarding.
- Setup a proxy to port
8080on your instance.
Set up a proxy to Vagrant. - Optionally override the default value for
role::mediawiki::hostnameby running vagrant hiera role::mediawiki::hostname <your new proxy hostname>.wmflabs.org (which adds that override to the config file at /srv/mediawiki-vagrant/puppet/hieradata/vagrant-managed.yaml) and thenvagrant provision. It defaults to the name of the Cloud VPS box, which is often a sensible choice. - Visit
https://<your new proxy hostname>.wmflabs.orgto see your new wiki - Login to MediaWiki on your instance as user admin and password vagrant then use Special:ChangePassword to change the admin password to something other than the MediaWiki-Vagrant default.


- Caution: There are many default settings in MediaWiki-Vagrant that leave your wiki insecure, it is tuned primarily to be a local development environment.
Additional commands
Since you are using the full MediaWiki-Vagrant stack on your instance, the same commands that you are used to using for local MediaWiki-Vagrant development on your local machine apply.
Note you will need to be in the /srv/mediawiki-vagrant directory for these commands to work.
- vagrant roles list to see all roles that you can enable.
- vagrant roles enable <role> to enable a role.
- vagrant provision to apply role changes to your LXC container.
- vagrant ssh to open a command shell inside the LXC container.
- See MediaWiki-Vagrant for additional instructions and tips.
How do I...?
Most of your questions should be answered by reading the "How do I....?" section on the MediaWiki-Vagrant page. Since 99% of the code is re-used, most of your questions should be answered there.
Update MediaWiki-Vagrant to the latest version
Run git pull (as yourself) in the /srv/mediawiki-vagrant directory.
Note: if there have been changes to the mediawiki-vagrant ruby code (Vagrant plugin), you will need to force a Puppet run on the host computer using sudo run-puppet-agent in order to update the Vagrant installation to use the newer plugin code.
Update the custom MediaWiki-Vagrant Vagrant plugin?
After updating /srv/mediawiki-vagrant via git pull you may receive an error from the vagrant command similar to "Message: RuntimeError: Your mediawiki-vagrant plugin isn't up-to-date. Please re-run `setup.sh`." If you try to follow this advice the setup.sh command will fail with a "Permission denied" error. This happens because the Vagrant environment is actually owned by the mwvagrant user and vagrant is a shell alias to a wrapper script that uses sudo.
The easiest way to update the installed version of the MediaWiki-Vagrant Vagrant plugin is by running Puppet on the host computer: sudo run-puppet-agent. If you really want to update manually for some reason, this command should work: cd /srv/mediawiki-vagrant && sudo -u mwvagrant -n -- /usr/bin/env VAGRANT_HOME="/srv/vagrant-data" ./setup.sh
Update MediaWiki and other applications
The Vagrant command git-update intelligently upgrades most of the pieces of MediaWiki.
$ cd /srv/mediawiki-vagrant
$ vagrant git-update
Edit MediaWiki and other git managed files
It's probably easiest to become user mwvagrant as that user owns most content that is managed by MediaWiki-Vagrant.
$ sudo su mwvagrant
$ cd mediawiki
$ # Make temporary local changes, etc.
$ exit
Send emails
Create a /srv/mediawiki-vagrant/settings.d/10-SMTP.php file with
<?php
$wgSMTP['host'] = 'mx-out03.wmcloud.org';
Migrate from using role::labs::vagrant
The best way to do this is just to build a new VM with role::labs::mediawiki-vagrant following the instructions above and migrate your wiki content and configuration over to the new host using normal methods. See Manual:Moving_a_wiki for more instructions.
Note: role::labs::vagrant has been renamed role::deprecated::labsvagrant. To find hosts where it is still in use, see watroles.
Create new MediaWiki-Vagrant roles
Patch the mediawiki-vagrant repository, either on diffusion or GitHub. See mw:MediaWiki-Vagrant for more details.
Test my puppet changes to Mediawiki-Vagrant
The best idea is for you to develop your patches in your local machine, push them to gerrit, pull them onto the Cloud VPS machine and test it there. This ensures that you don't have to put your private keys on the Cloud VPS instance.
- Submit a patchset to Mediawiki-Vagrant via Gerrit
- ssh to your Cloud VPS instance, and cd to
/srv/mediawiki-vagrant - Cherry-pick your patch from gerrit (you can copy paste the relevant
git cherry-pickcommand from the gerrit page for your changeset) - Run
vagrant provision
Choose how big an instance to use
Consider that Vagrant runs several services by default, including MySql, PHP and a Redis jobrunner. Especially if you plan to run heavy operations like unit testing big masses of code, to avoid swapdeath and/or OOM, choose the m1.medium or m1.large instances (4 and 8 GB RAM respectively).
Run a wikifarm
When using roles like centralauth and wikidata you will need to be able to access multiple wikis that are provisioned on a single Cloud VPS virtual machine. By default, role::labs::mediawiki_vagrant sets up its Apache2 configuration so that if you are running from a Cloud VPS instance named mycoolproject.eqiad1.wikimedia.cloud then Apache will route requests for something-mycoolproject.wmflabs.org the same as MediaWiki-Vagrant would route something.wiki.local.wmftest.net. All you need to do to get access to these wikis is to follow the instructions at Help:Proxy to setup a proxy for the something-mycoolproject.wmflabs.org DNS hostname to your mycoolproject.eqiad1.wikimedia.cloud instance.
If you want to change the base name of the wikifarm to something more meaningful for external users, you can customize the name by adding local hiera configuration data:
- Make a
/srv/mediawiki-vagrant/puppet/hieradata/local.yamlfile containing a base name that will be common to all of the wikis in your farm:
mwv::tld: '-mycommonwikifarmname.wmflabs.org'
role::mediawiki::hostname: "mycommonwikifarmname.wmflabs.org"
mediawiki::multiwiki::base_domain: "-mycommonwikifarmname.wmflabs.org"
- Enable role(s) that provide additional wikis (e.g. centralauth, wikidata)
- Run
vagrant provisionto update the /etc/apache2/site-confs/devwiki/00-default.conf - Configure web proxies to route to your instance using hostnames like
mywiki-mycommonwikifarmname.wmflabs.orgmywikihere would be the same name that precedes.wiki.local.wmftest.netwhen you are using MediaWiki-Vagrant on a laptop (e.g. "login", "centralauthtest", "wikidata", etc)- it can be handy to configure a proxy for
bogus-mycommonwikifarmname.wmflabs.orgso that you can visit the wiki via an invalid hostname (which will make it list all the valid ones)
- Profit!
Access the MySQL database
When you install MediaWiki using MediaWiki-vagrant, it will install it an instance of MySQL server inside the vagrant virtual machine. To access the database, you should first connect to the virtual. To do that you should first go to the directory where the virtual machine is stored (typically /srv/mediawiki-vagrant) and run vagrant ssh to connect to the virtual machine. At this point, you can simply run mysql at the command prompt of that virtual machine to connect to the MySQL server.
SSH to the Vagrant box
While you can always just SSH into the Cloud VPS box and vagrant ssh from there, you can set up a convenient shortcut via SSH forwarding. To do that, run vagrant ssh-config, copy the file used as the argument of IdentityFile to you local machine, then add something like this to your local SSH config file in ~/.ssh/config:
Host <WM Cloud box name>
  Hostname <WM Cloud  box name>.<WM Cloud project name>.eqiad1.wikimedia.cloud
  User <your LDAP username>

Host <WM Cloud box name>-vagrant
  ProxyCommand ssh -q <WM Cloud box name> nc -q0 <HostName from vagrant ssh-config>
  User vagrant
  IdentityFile <full path to the identity file you copied>
Then you can use ssh <WM Cloud box name> to ssh to the host and ssh <WM Cloud box name>-vagrant to ssh to the guest. This also works around T196537 for X11 forwarding (when used with ssh -X).
Troubleshooting
"No usable default provider could be found for your system."
This usually means that the shell alias for vagrant has not been setup for the current shell. type -a vagrant is expected to return "vagrant is aliased to '/usr/local/bin/mwvagrant'". source /etc/profile.d/alias-vagrant.sh can be used to set the alias in the current shell or the user can log out and log back into the Cloud VPS host.
Error message: "A Vagrant environment or target machine is required to run this command."
mwvagrant@my-cool-vm:~$ vagrant ssh
A Vagrant environment or target machine is required to run this
command. Run `vagrant init` to create a new Vagrant environment. Or,
get an ID of a target machine from `vagrant global-status` to run
this command on. A final option is to change to a directory with a
Vagrantfile and to try again.
This error has two likely causes:
- Your shell session does not have the necessary alias that remaps
vagrantto/usr/local/bin/mwvagrantmwvagrant@my-cool-vm:~$ type -a vagrant vagrant is aliased to `/usr/local/bin/mwvagrant' vagrant is /usr/bin/vagrant
- Solution: log out and log back into your Cloud VPS instance.
- Your working directory is not
/srv/mediawiki-vagrantor a subdirectory.- Solution:
cd /srv/mediawiki-vagrantand then try your command again.
- Solution:
Server not found
If your chosen proxy name is not the same as the hostname of the Cloud VPS instance, you will need to override the default value for role::mediawiki::hostname by creating a config file at /srv/mediawiki-vagrant/puppet/hieradata/local.yaml with role::mediawiki::hostname: <your new proxy hostname>.wmflabs.org and apply the change using vagrant provision.
Choose your wiki limbo state
The error asks you to specify a valid host header and you see a list of wikis to choose from but clicking on the wiki doesn't work. You can usually fix this problem by restarting the apache service inside the LXC container using a command like vagrant ssh -- sudo service apache2 restart.
"mount to NFS server (...) failed: RPC Error: Unable to receive"
If you get this error during bringing up a Vagrant box, you need to switch Vagrant to use NFS protocol v4:
vagrant config nfs_force_v4 yes
vagrant provision
vagrant reload
See also
Communication and support
Support and administration of the WMCS resources is provided by the Wikimedia Foundation Cloud Services team and Wikimedia movement volunteers. Please reach out with questions and join the conversation:
- Chat in real time in the IRC channel #wikimedia-cloud connect or the bridged Telegram group
- Discuss via email after you have subscribed to the cloud@ mailing list
- Subscribe to the cloud-announce@ mailing list (all messages are also mirrored to the cloud@ list)
- Read the News wiki page
Use a subproject of the #Cloud-Services Phabricator project to track confirmed bug reports and feature requests about the Cloud Services infrastructure itself
Read the Cloud Services Blog (for the broader Wikimedia movement, see the Wikimedia Technical Blog)