Fresnel
Fresnel is an automated tool for creating and comparing performance reports about web pages. It is used at Wikimedia Foundation to provide continuous feedback about the client-side performance of MediaWiki.
Find result
Fresnel runs on every patch submission to Gerrit for the master branch of mediawiki/core.git. The jenkins-bot user comments on the Gerrit change with a link to the Fresnel result.
Rerun
To run Fresnel on-demand, submit the phrase check perf as a Gerrit comment.
Scenario comparisons
Recording
Fresnel is based on a concept of scenarios. Each scenario consists of a name, a URL, and a number of options that configure the browser.
For MediaWiki core, the scenarios are configured in fresnel.yml.
Each of these scenarios will be performed against a local MediaWiki install for the current patch. And, for the parent commit as well.
Comparison table
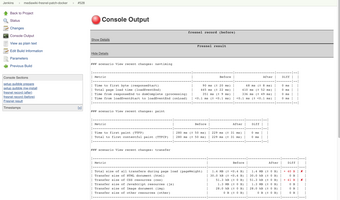
The "before" and "after" results of these scenarios are then compared and presented in the build output. Below are two examples.
-
Fresnel result showing a positive difference in transfer size, and page load time.
-
Fresnel result showing an increased cost for network transfers.
### scenario View a page: navtiming

|----------------------------------------------------|---------------------|---------------------|--------|--|
| Metric                                             |              Before |               After |   Diff |  |
|----------------------------------------------------|---------------------|---------------------|--------|--|
| Time to first byte (responseStart)                 |     83 ms (± 34 ms) |     72 ms (± 26 ms) |   0 ms |  |
| Total page load time (loadEventEnd)                |    345 ms (± 40 ms) |    334 ms (± 35 ms) |   0 ms |  |
| Time from responseEnd to domComplete (processing)  |    254 ms (± 24 ms) |    248 ms (± 36 ms) |   0 ms |  |
| Time from loadEventStart to loadEventEnd (onLoad)  | <0.1 ms (± <0.1 ms) | <0.1 ms (± <0.1 ms) |   0 ms |  |
|----------------------------------------------------|---------------------|---------------------|--------|--|
The comparison tables read as follows:
- Name of the scenario (e.g. "View a page", or "Load the editor").
- Name of the metric collector (e.g. "navtiming", "transfer", and "paint").
The "Before" and "After" columns show the aggregated result of the multiple repeat runs that Fresnel did for a given scenario. As of October 2023, Fresnel for MediaWiki repeats each scenario 7 times. The median is displayed with the variance between runs (as standard deviation) in parenthesis. There is a small amount of variance by default for time-based metrics. This is mainly due to general variance in CPU tasks in modern computing given that the operating system and background processes needing a few interruptions as well. Also, the Jenkins worker nodes are hosted in Wikimedia Cloud VPS, where CPU and disk availability is shared with other virtual machines.
The difference tolerates 1 standard deviation by default. For example, a duration of 200 ms (± 10 ms) is considered as having a difference if the new value is below 190 ms or above 210 ms.
Artefacts
Fresnel records all of its data as JSON files are collected as artefacts by the Jenkins job and can be viewed for additional details.
In addition to these JSON files, Fresnel sends additional probes to the browser that collect other artefacts: Timelines, and Screenshots.
Find artefacts
-
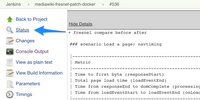
On the result page, go to Status.
-
From Status, go to Build Artefacts.
-
Go to
log/fresnel_records. -
File listing for one scenario-run.
Performance Timeline
If you have Chromium or Chrome Canary installed, then open the Chrome DevTools (e.g. on the Jenkins page itself) and drag the link to trace--trace.json onto it.

Screenshots

Run Fresnel locally
The Artefacts being saved by the Jenkins job should generally forego the need to reproduce a build locally. But, there's more to local use than merely reproducing the build.
Using Fresnel on your localhost allows you to iterate offline, and to compare any two recordings.
You can run Fresnel locally on any MediaWiki installation (consider a quick install):
- Fresnel (from npm, Node.js 10+).
- An environment variable telling Fresnel about your MediaWiki install.
You can install Fresnel from npm.
npm install fresnel@1.0.0
To run Fresnel, execute fresnel record from a MediaWiki core directory. Make sure you have the MW_SERVER the MW_SCRIPT_PATH environment variables set. You can set them for this terminal session only as shown below, but you may want to set them from your ~/.bashrc file instead so they're always set.
Once you have Fresnel installed, a typical workflow goes like this:
- Record the baseline for your comparison.
- Record the new state you want to compare to it.
- Compare the two.
Here's an example:
$ MW_SERVER=http://default.web.mw.localhost:8080 MW_SCRIPT_PATH=/mediawiki
$ cd mediawiki/
mediawiki$ git checkout master
mediawiki$ fresnel record "my baseline"
..

mediawiki$ # make some changes now, or checkout a different commit, etc.
mediawiki$ fresnel record "new"
..

mediawiki$ fresnel compare "my baseline" "new"

  scenario View a page: navtiming
  ..
How it all works
When the Jenkins job for mediawiki-fresnel builds your patch, it essentially does the following:
- Checkout your patch from Gerrit. (with help of Zuul's Git Merger to support
Depends-Onetc.) - Install MediaWiki as simply as possible. (This uses the PHP built-in server by running
php -Sin mediawiki/core; no Apache, database, or other setup; inspired by Quibble!) - Play back each of the scenarios in Headless Chromium (using Puppeteer). There are warmups and repeat runs as well. This is configured in fresnel.yml.
Quick MediaWiki
Get MediaWiki up and running in under a minute! No Apache, MySQL, Docker, or Vagrant PHP required. Only PHP (install from your package manager, e.g. Homebrew).
# Path from which to clone
export QMW_SRC="${MW_INSTALL_PATH:-https://gerrit.wikimedia.org/r/mediawiki/core}";
export QMW_DIR=/tmp/quickmw;
# For example:
# MW_INSTALL_PATH="$HOME/Development/mediawiki/core"
# Or, force getting it fresh from Gerrit:
# QMW_SRC="https://gerrit.wikimedia.org/r/mediawiki/core"

# Copy and execute as one command
test -n "$QMW_DIR" && rm -rf "$QMW_DIR" && mkdir -p "$QMW_DIR" && cd "$QMW_DIR" \
    && git clone --depth 1 -b master "$QMW_SRC" mediawiki && cd mediawiki/ && git clone --depth 1 https://gerrit.wikimedia.org/r/mediawiki/vendor && git clone --depth 1 https://gerrit.wikimedia.org/r/mediawiki/skins/Vector skins/Vector \
    && composer mw-install:sqlite \
    && php -S localhost:4000;
# …
# Listening on http://localhost:4000 !
New wiki should be up and running at http://localhost:4000.
What the above command does:
- Create a temporary clone of MediaWiki core. If you have a clone already, this should only take a few seconds. We also add vendor.
- Run
composer mw-install:sqlite. - Run
php -S localhost:4000.
Log:
Cloning into 'mediawiki'...
  Checking out files: 100%, done.
Cloning into 'vendor'...
  Receiving objects: 100%, 2.32 MiB/s, done.
The environment has been checked. You can install MediaWiki.
  Setting up database.. done
  Creating tables.. done
  Creating administrator user account.. done
  Creating main page with default content.. done
  MediaWiki has been successfully installed.
PHP 7.2 Development Server started
  Listening on http://localhost:4000
  Document root is /private/tmp/quickmw/mediawiki
  Press Ctrl-C to quit.
^C [runtime: 17s] $
Code steward
- Maintained by Release Engineering Team
- Live chat (IRC): #wikimedia-releng connect
- Issue tracker: Phabricator (Report an issue)
See also
- Source code (Gerrit): performance/fresnel.git
- Release Engineering/Runbook/Fresnel


